Responsive Shopify Theme - QuickShop
Documentation 2.1.1 (Still Updating...)
- Demo: http://demo.roarapi.com/shopify/quickshop
- Latest Document: http://docs.roarapi.com/shopify/quickshop
- Created: January 01, 2014
- Latest Update: August 11, 2017
- By: RoarTheme
- Support: http://support.roarapi.com
Thank you for purchasing this theme. If you have any questions or need support, please help me submit a ticket to http://support.roarapi.com
This theme is designed to use with Shopify only.
This documentation is made with Documenter
Theme File
If you purchased our theme from Themeforest. You can download the theme anytime from Themeforest > Your Account > Downloads.
Navigate through your purchased items and find Quickshop. Theme File is always in ZIP format. Unzip it and here's the list of what's included:

- Packages - Contains Installable Skins (.zip). The valid file to upload to your Shopify store via Admin Panel should be here.
- Documentation - Contains theme documentation file.
- Licensing - Contains all licensing info files.
- Changelog (.txt) - Includes all theme versions changelog info.
- Readme (.txt)
Theme Support
Many support queries and technical questions will already be answered in this documentation, so please read this item first. You can also find other tips/tricks in our solutions/articles. If you can’t find the answer you’re looking for, please:
- Check Quickshop document in online version at http://docs.roarapi.com/shopify/quickshop. This is always the latest document
- Submit a ticket to http://support.roarapi.com
- Email us via support@roarapi.com
What's included
- Responding to questions or problems regarding the item and its features
- Fixing bugs and reported issues
- Providing updates to ensure compatibility with new software versions
What's NOT included
- Item customization
- Setting up your store
- The theme is customized without our permission
- Support for third party customs/software/plug-ins
- Teaching you HTML & CSS etc.
- Item customization
- Setting up your store
- The theme is customized without our permission
- Support for third party customs/software/plug-ins
- Teaching you HTML & CSS etc.
Installation
(!!!)IMPORTANT: To start the installation, you MUST unzip the Theme File beforehand.
- From your Shopify admin, click Online Store, and then click Themes
- Click Upload A Theme in the top right-hand corner
- From the Upload A Theme dialog, click Choose File to select one of the .zip files in the Packages folder (mentioned above)
- Click Upload
To publish the theme on your storefront immediately, click Publish theme
Theme Settings
To customize this theme's appearance and settings
In your backoffice go to: Online Store > Themes:
-
Click: Customize theme
In your Theme Settings:
-
Overview:

-
This theme support Shopify Section (click for more info), which offers an easier way to customize your store's home page content
To edit the homepage content, please edit the pre-set sections on homepage. You can click on them to edit (there is also an option to remove inside) or drag them to the order you want.
You can also click Add section to add more sections you like
-
The General Settings tab provides global settings for the theme. The below content of this documentation is focusing on these settings
Page Background
Page Background
-
Go to: Theme Settings > Aesthetics > Scaffolding

-
Edit and Save
Page Selector
-
Go to: Theme Settings > General > Page Selector

-
Edit and Save
Fonts
-
Go to: Theme Settings > General > Fonts

-
Edit and Save
Change Logo and Favicon
Site Logo
You can create logo with image format or text format.
-
Go to: Theme Settings > Header > Site Logo

-
Edit and Save
Favicon
-
Go to: Theme Settings > General > Favicon

-
Edit and Save
Navigation
Navigation in PC
-
Go to: Theme Settings > Header > Navigation

-
Edit and Save
-
Review in front-end

Navigation in Mobile
-
Go to: Theme Settings > Header > Navigation

-
Edit and Save
-
Review in front-end

Creating Dropdown Menu
-
For every link we wish to connect to a sub-menu, we'll create a link list that will have the same name as said (parent) link. Say what? Let's take an example. A typical Main Menu in Shopify contains the following links:

-
Say we wanted to include a link called Shop:

-
And we wanted that link to become a drop-down sub-menu listing the brands in our shop, with links to vendor collections. Then what we'd do is create a link list called Shop:

-
Again, make sure that the name and handle matches what you have chosen for the parent link:

-
And we'd fill up that link list with links to our vendor collections:

-
To turn any link of our Main Menu into a 'parent' link, create a 'child' menu for it using the name of your parent link.
Now, time to make our theme smart.
Mega Menu
This theme come with Mega Menu module, allowing you to create menu with sub-items and background image. Here's an example:

How to create a Mega Menu like that?
- Go to Admin > Online Store > Navigation and create 5 linklists:
-
One represents for the main menu.
-
To make a sub menu for an item, create a linklist with same name with the item. So, we need 4 more linklists which represent for 4 sub menus

- Go to Customize theme > General > Mega Menu and choose the linklist represent for the main menu:

Header
-
Customer Links
-
Enabling Accounts
To enable customer accounts, select Settings > Checkout > Customer accounts. There are three options available, as noted below.
Go to: Settings > Checkout > Customer accounts

-
Configuration
Go to: Theme Settings > Header > Customer links

-
Review in front-end

-
-
Currencies switcher
-
Go to: Theme Settings > Header > Currencies switcher

-
Go to: Settings > General > Standards & formats

-
Review in front-end

-
-
Cart info
-
Go to: Theme Settings > Header > Cart info

-
Review in front-end

-
-
Search
-
Go to: Theme Settings > Header > Search

-
Review in front-end

-
-
Social Media Icons
-
Go to: Theme Settings > Header > Social Media Icons

-
Review in front-end

-
-
Edit and Save
Footer
-
Footer Link list
-
Go to: Theme Settings > Footer > Footer Link list

-
Review in front-end

-
-
Mailing
-
Go to: Theme Settings > Footer > Mailing List Widget

-
Review in front-end

-
-
Contact Information
-
Go to: Theme Settings > Footer > Contact Information

-
Review in front-end

-
-
Twitter Widget
-
Go to: Theme Settings > Footer > Twitter Widget

-
Review in front-end

-
-
Payment methods
-
Go to: Theme Settings > Footer > Payment methods

-
Review in front-end

-
-
Edit and Save
Collection Page
-
Go to: Theme Settings > Collection Page

-
Edit and Save
-
Review in front-end

Product Page
-
Misc Configuration
Go to: Theme Settings > Product Page > Misc

-
Look and Feel
Go to: Theme Settings > Product Page > Look and Feel

-
Sharing Buttons
-
Go to: Theme Settings > Product Page > Sharing Buttons

-
Review in front-end

-
-
Collection Beneath Product
-
Go to: Theme Settings > Product Page > Collection Beneath Product

-
Review in front-end

-
-
Sale off logo
-
Go to: Theme Settings > Product Page > Sale off logo

-
Review in front-end

-
-
Sidebar
-
Go to: Theme Settings > Product Page > Sidebar

-
Review in front-end

-
-
Edit and Save
Blog Page
-
Go to: Theme Settings > Blog Page

-
Review in front-end

-
Edit and Save
Contact Page
-
Creating or opening up your Contact Us page

-
Adding some content to your Contact Us page (or not)

-
Assign the page.contact.liquid template to your Contact Us page
Go back to your Contact Us page in your shop admin.
Select 'page.contact' in the Template drop-down like so:

-
Go to: Theme Settings > Contact Page

-
Edit and Save
-
Review in front-end

Cart Page
-
Go to: Settings > Cart Page

-
Edit and Save
-
Review in front-end

Wishlist Page
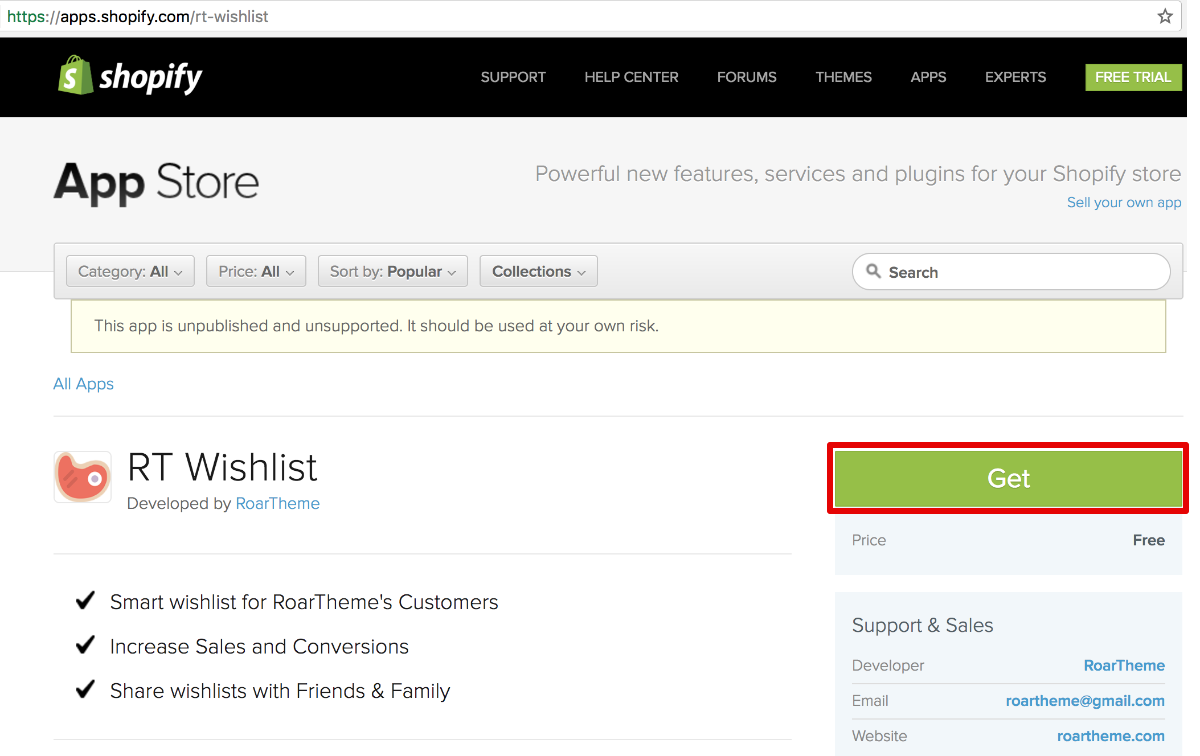
This theme comes with a wishlist app called RT-Wishlist, which is developed by RoarTheme. If your QuickShop theme license is legal, you have the right to use it for free.
-
Go to https://apps.shopify.com/rt-wishlist to get the app. If you are prompted to log into your store, just do it
-
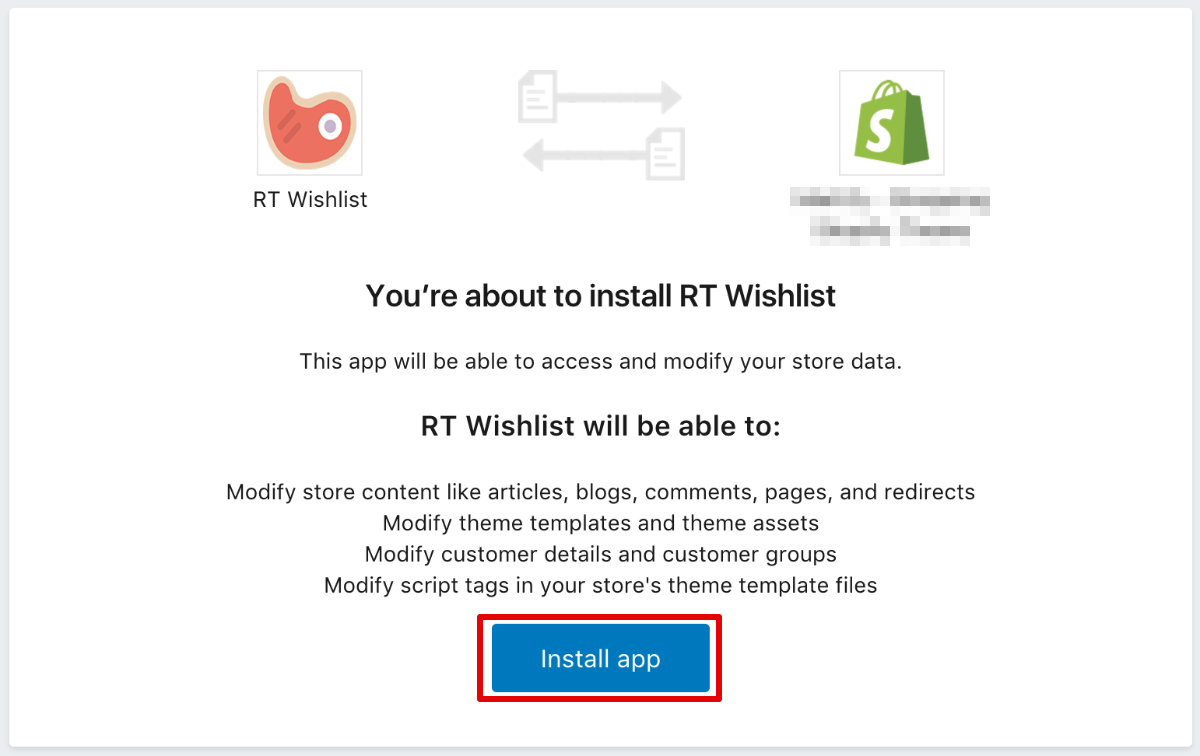
Confirm the installation:
-
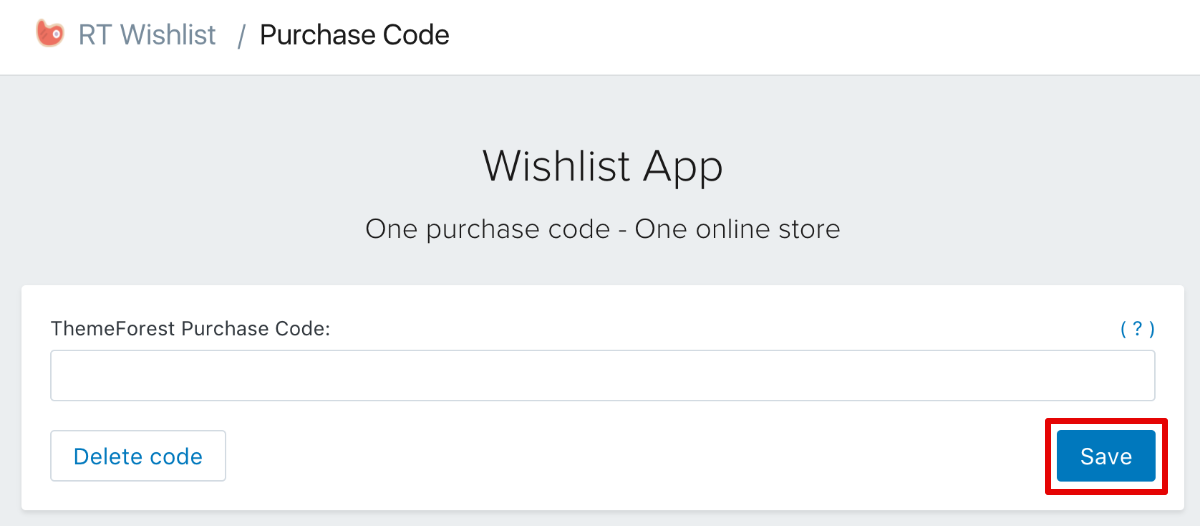
Enter the purchase code of your theme & click Save. If you don't know how to get the purchase code, please refer here
-
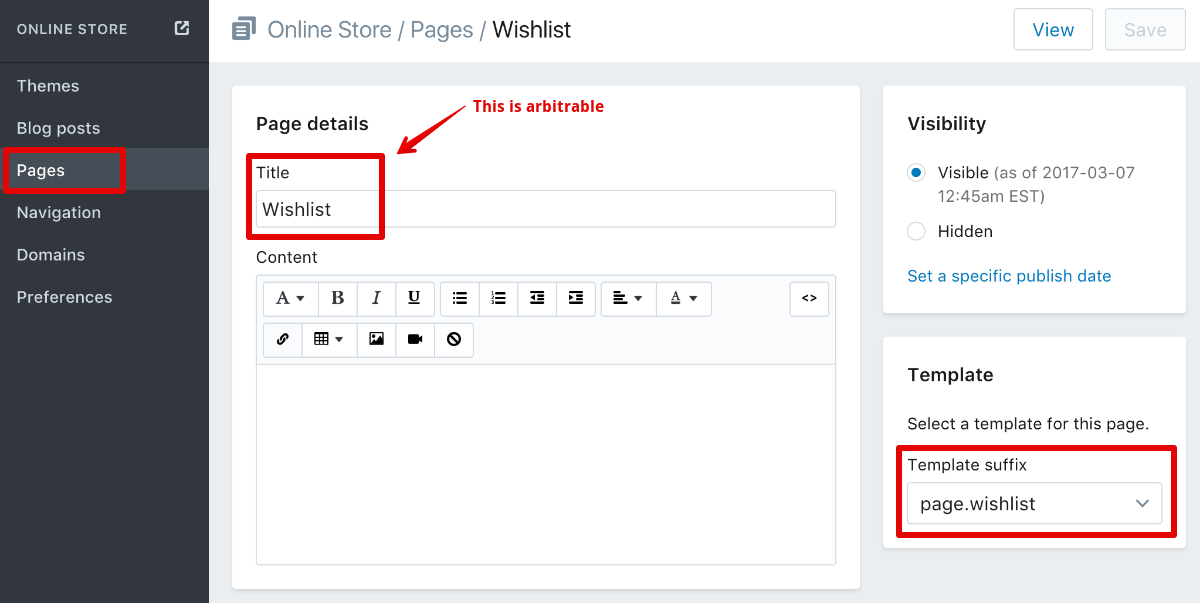
Go creating a page for wishlist. Please note that you must set the Template as page.wishlist
-
Go to Customize theme > General settings > Wishlist Page, and choose the page you just created.

Account Page
-
Go to: Theme Settings > Account Page

-
Edit and Save
-
Review in front-end

-
Review Register

-
Review Order History

-
Review Manager Addresses

-
Review Order Details

Translations
Here's a quick way to change some of the more commonly text
-
Go to: Theme Settings > Translations

-
Edit and Save
Checkout Area
-
Review Checkout - Step 1

-
Review Checkout - Step 2

-
Review Checkout - Step 3

FAQs Page
-
Create FAQs Page
Go to: Pages > Add page with Handle
faqsand pressShow HTML
-
Press: Add FAQ button to add new FAQ

-
Press: General FAQ button to general new html code

-
Copy your new html code and Paste to your FAQs page

-
Save
Product Description
-
Go to: Products > choose your product and press
Show HTML
-
Press: Add Tab button to add new tab for description

-
Press: General Description button to general new html code

-
Copy your new html code and Paste to your product page

-
Save
Mailing with MailChimp
Where do I get my MailChimp Form Action?
Those themes contain a theme setting called MailChimp Form Action or something similar. The MailChimp form action is the only piece of information the theme needs to hook up its signup form to your MailChimp account.
Requirements
To complete this tutorial, you will need:
- A MailChimp account.
- A MailChimp list (to learn all about lists in MailChimp, click Support from the Mailchimp homepage, then scroll down and click Getting Started.)
- A Shopify Theme that integrates with MailChimp (it has a MailChimp Form Action theme setting.)
If you're using a mobile device, the screenshots in these instructions might not be entirely accurate. If you can't see MailChimp menu options at any time, try clicking the More button at the top left of the screen.

To obtain the code for your MailChimp Form Action:
1. Log into your MailChimp account.

2. Click the Lists button in the left navigation bar.

3. Click the drop-down box on the right, and choose Signup forms.

4. Choose Embedded forms.

5. On the Embedded form code page, click on Naked.

6. Scroll down and locate Copy/paste onto your site.

7. Double-click anywhere in the box to select the code.
8. Copy the code to your clipboard (use CMD-C for Mac or CTRL-C for Windows).
10. Paste the code into any text editor so that you can view it.
11. The only line of this code that you need is the action attribute value in the opening form tag. Reading from the top of the code, it's located between the second set of quotation marks. Don’t select the quotation marks themselves, just what's inside them.

Copy the selected action attribute value to your clipboard.
12. In a new tab, open up your shop admin.
13. From your shop admin, click Themes to go to your Themes page.
14. Click on the Theme Settings button.

15. Now you need to locate the MailChimp form action field in the Theme Settings. It might be called Mailchimp form action URL, or MailChimp Form Action, or similar. Its location varies from one theme to another, but it's most likely to be in the header, footer, or home page section.
16. Paste the action attribute value into the MailChimp form action field. In the Your theme, the field looks like this:

17. Save your changes.
18. Test things out by subscribing to your own MailChimp newsletter.
Mailing with Campaign Monitor
Those themes contain a theme setting called Campaign Monitor Form Action or something similar. The Campaign Monitor form action is the only piece of information the theme needs to hook up its signup form to your Campaign Monitor account.
Requirements
To complete this tutorial, you will need:
- A Campaign Monitor account.
- A Campaign Monitor list (to learn all about lists in Campaign Monitor, click Support from the Campaign Monitor homepage, then scroll down and click Getting Started.)
- A Shopify Theme that integrates with Campaign Monitor (it has a Campaign Monitor Form Action theme setting.)
To obtain the code for your Campaign Monitor Form Action:
1. Log into your Campaign Monitor account.

2. Click the Lists & Subscribers button in the top navigation bar.

3. Click the subscriber lists as you like.

4. Choose Grow your audience in the right navigation bar.

5. Click on Copy/paste a form to your site.

6. Scroll down and click Get the code.

7. Double-click anywhere in the box to select the code.
8. Copy the code to your clipboard (use CMD-C for Mac or CTRL-C for Windows).
10. Paste the code into any text editor so that you can view it.
11. The only line of this code that you need is the action attribute value in the opening form tag. Reading from the top of the code, it's located between the second set of quotation marks. Don’t select the quotation marks themselves, just what's inside them.

Copy the selected action attribute value to your clipboard.
12. In a new tab, open up your shop admin.
13. From your shop admin, click Themes to go to your Themes page.
14. Click on the Theme Settings button.
15. Now you need to locate the MailChimp form action field in the Theme Settings. It might be called Mailchimp form action URL, or MailChimp Form Action, or similar. Its location varies from one theme to another, but it's most likely to be in the header, footer, or home page section.
16. Paste the action attribute value into the MailChimp form action field. In the Your theme, the field looks like this:
17. Save your changes.
18. Test things out by subscribing to your own MailChimp newsletter.
Limited Offers
-
Go to: Theme Settings > Limited Offers

-
Save
Mailchimp Popup
-
Go to: Theme Settings > Extentions > Popup Mailchimp

-
Save
ONE Product Selling
-
Go to: Theme Settings > Homepage > Only one Product

-
Save
Twitter Widget
-
Go to: Theme Settings > Extensions > Twitter Widget

-
Twitter ID

-
Save
Facebook Widget
-
Go to: Theme Settings > Extensions > Facebook Widget

-
Save
-
Go to: Theme Settings > Extensions > Instagram

-
Save
Flickr
-
Go to: Theme Settings > Extensions > Flickr

-
Save
Tweet to get Discount Code
-
Create Discount Confirmation Page
Go to: Pages > Add page with Template
page.discount
-
Go to: Theme Settings > Product Page > Tweet to get Discount Code

-
Edit and Save
Product Reviews Integrated
-
!!! IMPORTANT: You must install Product Reviews app before modifying these settings.
-
Go to: Theme Settings > Product Page > Product Reviews

-
Save
Adding color swatches to your products
-
Review in front-end

Recently Viewed Products
-
Go to: Theme Settings > Product Page > Recently Viewed Products

-
Save
-
Review in front-end

Notification Products
-
Go to: Theme Settings > Extensions > Notification Products

-
Save
-
Review in front-end

How to enable advanced group filtering
So you have a lot of products and want to enable sub groups for your users to sort through. Follow the steps below to enable advanced group filtering like the image below.

-
Define your groups. In the image above, the groups are Brand, Focal Length, and Resolution
-
Export your products into a CSV file.
(If you are creating new products, you can skip this step)

-
Prepend all existing tags with what group you want them to be in, with the format Group_Tag Name
Based on our image at the top of this page, we would have tags like Brand_Canon, Focal Length_18 - 55mm, and Resolution_12 MP.
The left side of the underscore is the group name, and the right side is the tag for the product. Spaces can be included on either side of the underscore.
-
Save your .csv file and import the products back into your store.
Make sure you check "Overwrite existing products that have the same handle" when uploading the file to prevent duplicate products from being created.
-
Enable "Filter by groups" in your theme settings under "Collection Page"

Social Media Icons
Go to: Theme Settings > Extensions > Social Media Icons
Save